Hair guide 1
1. Firstly, as day old hair is best for curls, the night before wash your hair with a curl enhancing shampoo and conditioner.
2. With a 1" 1/2 or 2" Curling Iron, wrap your hair till about half way up around the iron, so the top is smooth by from ear height downwards is curly. Repeat all over till your hair is fully curled.
3. If you have a side fringe, take it and straighten (or run through your curling iron) upwards, to keep it smooth yet give it a flicked up look. If you get confused look at the picture.
4. Gather your hair at one side near your ear and seperate it into three. Take the front piece and place it over the back piece (Like the start of a plait) to get the curled, full look the top of Taylor's pony has. Leave a piece out, then take a hair elastic and secure it as a low ponytail.
5. Take the piece you left out and wrap it around so you can't see the hair elastic, then secure with a bobby pin.
And there you go. You've got Taylor's look!
Remember, all sugessted brands are just suggestions, and you can use other products to achieve a similar look.
Hair guide 2: photoshoot
1.) Shampoo and condition your hair and then rinse thoroughly.
2.) You can either let your hair airdry or blow dry it on a low heat setting.
3.) When your hair is dry enough to straighten it (Normally this is all the way dry or very slightly damp) start straightening it.
4.) If you want, before you start to straighten, you might want to apply a stay-in conditioner to your hair.
5.) To Straighten: Separate your hair into 5 sections, and then take a straightener and straighten your hair in about 1" or 2" sections. While straightening, on some of the ends of your hair slightly bring the straightener up, to give it flip and body. (Refer to pictures)
6.) When you're done straightening, part your hair on the right side of your head.
7.) If you have bangs style them as you normally would. If you don't have any bangs, when you part your hair it will end up naturally looking like taylor's hair in this picture.
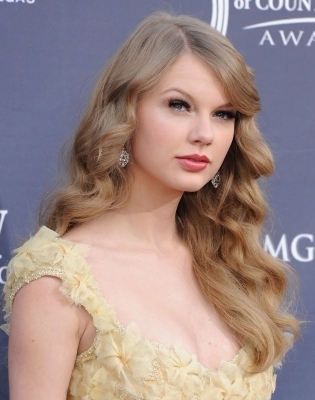
Hair Guide 3: Marie Claire photoshoot 2010
1.) Shampoo your hair, and condition the ends. Towel and air dry, parting it on the right side.
2.) Take a 2" curling iron, and curl fairly large sections of your hair, clamping at the ends of the sections and rolling the barrel up the inside, or underneath. Using the end of a comb, or even a pencil, run it down the curl to break it up.
3.) To curl the front correctly, hold the curler under the section of hair, wrapping it over and around the curler.
4.) Spray everything with hairspray, the curls are larger and more likely to drop easier.
Hair guide 4: "Mine" music video - cafe scene 2010
1.) For this hairstyle, it is best to start with day-old hair (being washed the day before), but if you do wash your hair, be sure to condition the ends and blow dry until completely dry. Part your hair on the right side of your face, and divide into three sections - right, back, and left. To create a back section, brush backwards from the crown of your head, and gather the section of the hair that the brush grabs.
2.) Using a 1" or 1 1/2" curling iron, curl sections of your hair no thicker than your thumb by wrapping the hair around the open barrel and clamping down. When the hair is hot to touch, gently release. Repeat all over your head, save for the very front of the left and right sides. To curl the left side of your hair, place the curling iron vertically next to your face and open the barrel, and wrap your hair around the front of the barrel and clamp. Gently release when hot, and the curl the lower part of the section of hair the same way you did the rest of your hair. Repeat on the right side. Spray your hair lightly with hairspray.
3.) To make your curls look more natural, take a wide-toothed comb, or even a vented hairbrush and comb through your hair. The idea is to make your curls more relaxed, not to erase them completely, so be gentle. Now, bring all your over to the left side of your face, and divide into three sections, much like you did before. Leave out the front most curl on the right side, and the front part of the left section. To begin braiding, take the right section and bring it over the middle, then the left section over the middle, and so one. Plait your hair as far down as you can, don't worry about making it perfect, or if ends stick out.
4.) Now you can recurl the front sections of your hair is they've dropped out a little too much, and spray the front section, as well as the plait with hairspray. Don't forget to spray the first few folds of your plait, and if you have shorter hair, you may need to use pins to keep your hair up. If you do need to pins, arrange them in an 'x' shape, so they will hold.
The ultimate hairstyle:
Hair guide 5: "Love Story" music video
This is a really high-mainantance, difficult hairstyle that is probably best reserved for prom and special occasions since it will take a long LONG time to do. I played around with this and the best way of doing it perfectly is very fiddly. You should really take care not to get burned as you do this.
1. Wash your hair and dry it so it is soft and easy to manage. Some may find this will work best with day old hair, but I think it may vary between people.
2. Seperate the first two inchs back from your forhead from the rest of your hair, as as you can see from the picture, thisis not curled and is best pinned out of the way.
3. Look at the back of Taylor hair if you are unsure about this part. Take one inch sections of your hair and clamp your curling icon onto the end and roll upwards vertically as you would usually do when curling, but when the tong is right next to your scalp, clip the rolled up curl to your head. Be careful you don't touch the iron as you clip the curl up. Again, if you don't understand what I mean look at the back of Taylor's hair. Repeat this all over so the back of your hair is completely in curls pined to your head.
4. For the front section of your hair, put a side part in then curl it a little at the sides and pin into the rest of your hair, like Taylor's is in the bottom-right hand picture. Then place a thin gold band between the fringe part of the curls and the pinned curls.
5. Pull out a few wisps (carefully!) and curl these to frame your face.
6. To give it extra holding power, give your hair a good coat of hairspray to make sure it stays in place and doesn't frizz.
And you are done!

hair guide 2

Hair guide 3

Hair guide 4

Hair guide 5
Looks like Bey was right: Girls, they run this MOTHA!
Forbes’s annual list ranks the richest and famous of the already rich and famous, and this year WOMEN dominated the top ten.
Oprah stepped into first place, knocking last year’s top finisher, the Biebs, down to ninth.
Thank goodness he’s got a married girlfriend to cry to! LOL!!!
Beyoncé may be a slob at home, but when it comes to her business, she’s got everything right where it should be, coming in at number four.
Lady Gaga was second, with Taylor Swift, Madonna, and Ellen DeGeneres rounding out the female majority.
Get it, girlfriends! CONGRATS!!!